





 Postagens


Mostrando postagens com marcador .... Mostrar todas as postagens
Mostrando postagens com marcador .... Mostrar todas as postagens
Jogando Super Nintendo no Android com controle original

http://www.youtube.com/watch?v=_FZTz2KO9vU .
Mas tem um detalhe muito importante este projeto, é para NES e não o SNES (mais novo), ou seja, sabia que era possível fazer e tinha os materiais para isto, então só esperei sobrar um tempo para fazer (o único componente que não tinha era o controle, mas consegui um paralelo por R$ 8,00 no Mercado Livre).
vimeo.com/bsoares/snes-on-android-with-controller-and-bluesmirf
Como funciona:
O controle do SNES esta ligado a Arduino, é bem fácil obter as teclas pressionadas, mas existe uma biblioteca para tornar esta tarefa ainda mais simples (NESpad/SNESpad). Cada tecla pressionada liga um bit dentro do número que representa o estado das teclas do controle, e este estado (número) é enviado via Bluetooth (uso o BlueSMiRF) para o Android.
No Android, quem recebe este número é o Amarino, mas ele apenas recebe o número, ainda é necessário um App (que foi modificado a partir deste exemplo “SoftKeyboard“) para converter este número em teclas pressionadas (uso Bitwise) como um teclado do Android.
Por fim é só configurar o emulador para entender as teclas pressionadas como os comandos dentro do mesmo (pular, andar, girar, etc…)
Desta forma o controle pode ser usado como o teclado do seu Android, e ainda ser configurado como o controle de outros emuladores.
Sobre o módulo bluetooth BlueSMiRF:
Depois de configurado ele será o seu “cabo USB virtual” pois da mesma forma que usamos o comando Serial.print(“…”) para enviar dados via porta serial, o mesmo dado será enviado via bluetooth.
A App Amarino utiliza 57.600 de baudrate, e os módulos BlueSMiRF normalmente vem com 9.600.
Para configurar o blueSMiRF utilizei alguns tutoriais:
- http://todbot.com/blog/2006/02/23/howto-mac-os-x-bluetooth-serial-port/
- http://www.sparkfun.com/tutorials/67
Sobre o Soft Keyboard (App para Android):
Modifiquei o exemplo de Keyboard App disponível no Android Developers para obter os dados via Amarino e agir como teclado. Me baseei neste projeto criado para NES, porém criei outro código para a Arduino e alterei 95% do código para o Android.
O código fonte do projeto para Androi, Arduino e as versões das bibliotecas que foram utilizadas, podem ser baixadas do meu Github:
https://github.com/BSoares/SNES-on-Android-with-original-controller
Os Códigos Usados estão aqui:
https://github.com/BSoares/SNES-on-Android-with-original-controller


Créditos para :
http://blog.bsoares.com.br/category/arduino#bitwise-right-shift
4.10) Hello World com LCD + Arduino
LiquidCrystal - "Hello World!"
Tutorial Famoso Hello World compativel com Hitachi HD44780 driver.
Esse LCD tem uma interface paralela, ou seja, você pode fazer diversos tipos de comandos/telas/caracteres... tudo pelo microcontrolador.
Hardware Necessário:
- Arduino
- Tela LCD (compativel com Hitachi HD44780 driver)
- Potenciômetro 10k
- ProtoBoard
- Fios de Conexão
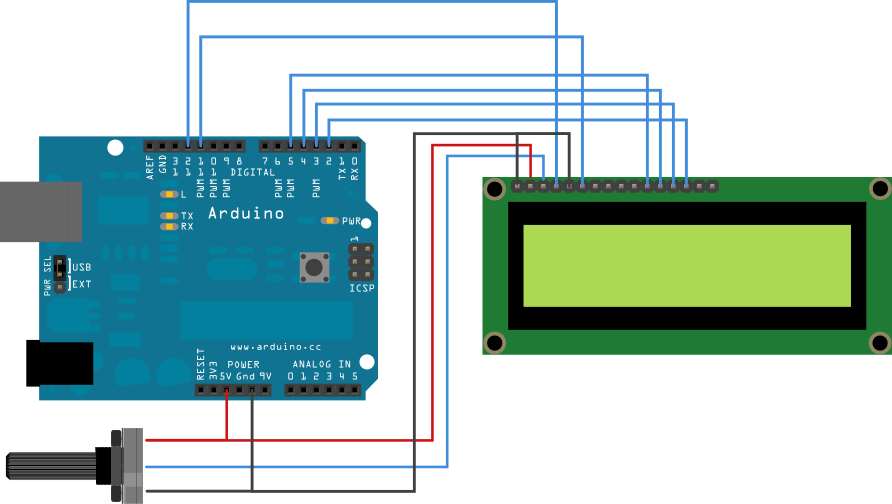
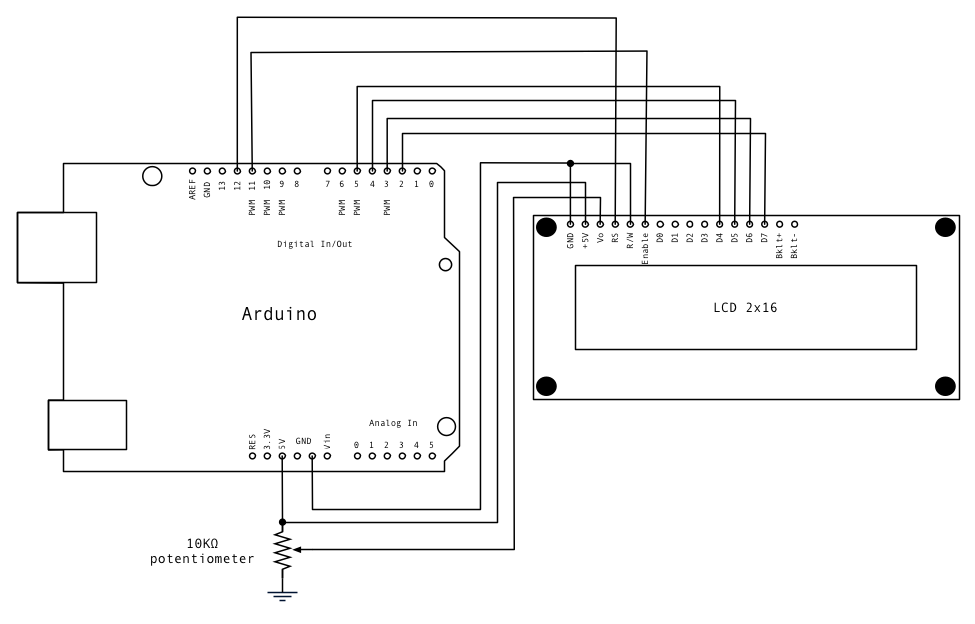
Circuito:
- Pino LCD RS digital 12
- Pino LCD no pino digital 11
- Pino LCD D4 no pino digital 5
- Pino LCD D5 no pino digital 4
- Pino LCD D6 no pinodigital 3
- Pino LCD D7 no pino digital 2
Como na Imagem Abaixo:
Antes de Codear aí....
Preste atenção que você terá de incluir #include <LiquidCrystal.h>pois é a bibioteca do LCD, definir os pinos de saida e entrada de dados ... aí sim joga sua Mensagem pra ele...
posteriormente vou colocar uns esquemas legais de ficar indo e voltando, piscar...menus com interatividade...
Se você ja Viu os outros tutoriais ja deve saber... de uma olhada em pisca LED, nos Projetos Simples, você coloca comando delay(1000) manda lcd.print(" ") ou seja nada, depois seu texto denovo... com a VOID LOOP dai ele vai piscar seu texto de 1 em 1 segundo...
Código:
/*
LiquidCrystal Library - Hello World
Library originally added 18 Apr 2008
by David A. Mellis
library modified 5 Jul 2009
by Limor Fried (http://www.ladyada.net)
example added 9 Jul 2009
by Tom Igoe
modified 22 Nov 2010
by Tom Igoe
This example code is in the public domain.
http://www.arduino.cc/en/Tutorial/LiquidCrystal
*/
// include the library code:
#include <LiquidCrystal.h>
// initialize the library with the numbers of the interface pins
LiquidCrystal lcd(12, 11, 5, 4, 3, 2);
void setup() {
// set up the LCD's number of columns and rows:
lcd.begin(16, 2);
// Print a message to the LCD.
lcd.print("hello, world!");
}
void loop() {
// set the cursor to column 0, line 1
// (note: line 1 is the second row, since counting begins with 0):
lcd.setCursor(0, 1);
// print the number of seconds since reset:
lcd.print(millis()/1000);
}
LiquidCrystal Library - Hello World
Library originally added 18 Apr 2008
by David A. Mellis
library modified 5 Jul 2009
by Limor Fried (http://www.ladyada.net)
example added 9 Jul 2009
by Tom Igoe
modified 22 Nov 2010
by Tom Igoe
This example code is in the public domain.
http://www.arduino.cc/en/Tutorial/LiquidCrystal
*/
// include the library code:
#include <LiquidCrystal.h>
// initialize the library with the numbers of the interface pins
LiquidCrystal lcd(12, 11, 5, 4, 3, 2);
void setup() {
// set up the LCD's number of columns and rows:
lcd.begin(16, 2);
// Print a message to the LCD.
lcd.print("hello, world!");
}
void loop() {
// set the cursor to column 0, line 1
// (note: line 1 is the second row, since counting begins with 0):
lcd.setCursor(0, 1);
// print the number of seconds since reset:
lcd.print(millis()/1000);
}
Esse talvez pisca, como ainda não tenho arduino não testei , mas pelo meu pouco conhecimento acho que funciona, sei que compilou e não deu erros, pelo menos testar eu sei que não daria problema nenhum então testem e me avisem...
/*
LiquidCrystal Library - Hello World
Author: Marcelo Boeira
This example code is in the public domain.
http://www.arduino.cc/en/Tutorial/LiquidCrystal
*/
// include the library code:
#include <LiquidCrystal.h>
// initialize the library with the numbers of the interface pins
LiquidCrystal lcd(12, 11, 5, 4, 3, 2);
void setup() {
// set up the LCD's number of columns and rows:
lcd.begin(16, 2);
}
void loop() {
// set the cursor to column 0, line 1
// (note: line 1 is the second row, since counting begins with 0):
lcd.setCursor(0, 1);
// print the number of seconds since reset:
lcd.print(millis()/1000);
// Print a message to the LCD.
lcd.print("hello, world!");
delay(1000);
// Print empty message
lcd.print(" ");
delay(1000);
}
LiquidCrystal Library - Hello World
Author: Marcelo Boeira
This example code is in the public domain.
http://www.arduino.cc/en/Tutorial/LiquidCrystal
*/
// include the library code:
#include <LiquidCrystal.h>
// initialize the library with the numbers of the interface pins
LiquidCrystal lcd(12, 11, 5, 4, 3, 2);
void setup() {
// set up the LCD's number of columns and rows:
lcd.begin(16, 2);
}
void loop() {
// set the cursor to column 0, line 1
// (note: line 1 is the second row, since counting begins with 0):
lcd.setCursor(0, 1);
// print the number of seconds since reset:
lcd.print(millis()/1000);
// Print a message to the LCD.
lcd.print("hello, world!");
delay(1000);
// Print empty message
lcd.print(" ");
delay(1000);
}
Conteúdo do Site Arduino.cc
Veja Mais em: http://arduino.cc/en/Tutorial/LiquidCrystal
Traduzido bem Por Cima...
Desculpem os erros, ta mais no sentido da tradução...
Assinar:
Postagens (Atom)